Subaru WRX // ECU Tuning
ECU Flashing Guide
2004+ WRX
An overview of the flashing process using ECUFlash and the Tactrix cable via the OBD-II port. Read through completely before starting.
What you'll need
Jump the flash connector
Before flashing, the ECU needs 12V supplied via the flash connector. With the key out of the ignition, locate the flash connector under the dash on the driver's side.
Jump the pins vertically in columns using 20 AWG stranded wire (remove a few strands to get a snug fit, then tin the ends). This is the 04+ configuration � the tab is at the top.

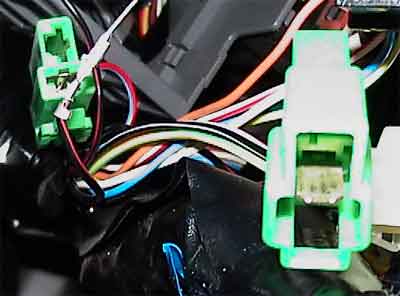
Connect the diagnostic connectors
After jumping the flash block, connect the green diagnostic connectors shown below. You should have already seen them when installing the jumper wires in step 1.
Connect the Tactrix cable
Plug the Tactrix cable into the OBD-II port (shown below). Connect the USB end to your laptop. Make sure the FTDI drivers are already installed before this step.

You're now ready to flash. Open a command prompt and navigate to the folder where ECUFlash is installed. Read the release notes in full before continuing.
Dump and back up your stock ECU
Before doing anything else, back up your original ECU image. Don't skip this. Once you have the dump, back it up twice � locally and by uploading to openecu.org to help the research community.

Adjust the COM port number to match your system � check Device Manager if you're unsure. Once you run the correct command, ECUFlash will walk you through the rest. Two files will appear in the program directory when it's done.
Test flash your image
Always run a test flash before writing to the ECU. A test goes through the entire process with writing disabled � if the test passes, the real flash is likely to succeed. If a real flash fails mid-write, your ECU may be bricked.
A test ends with "Flash Failed" � this is normal and expected. It means the test ran correctly; writing was intentionally disabled.
An error mid-process with an incomplete flash is a real failure. Do not start the car. Do not disconnect the battery. Attempt a re-flash immediately.


Flash the ECU
With the test passing, you're ready to do the real write. Follow the same syntax as the test flash, substituting /tfi with your actual flash flag per the release notes.
